Now that we have .Net Core Framework running on the RPI,
and already build a Console App + SQLite database
It’s time to create a ASP.Net Core App that is linked to an SQLite database.
Instead of coding everything from scratch, we again can start again from a tutorial source code :
See here for an ASP.net Core MVC Example
See here for an ASP.net Core Razor Page Example.
In these tutorials the development was done using Visual Studio.
I will demonstrator that you don’t need the big elephant IDE on your machine
You can use the either more slim Visual Sudio Code, which is distributed out of the box in your Raspbian.
Or as being a scripter or Linux user, you can do all from the command line too ![]()
I used this tutorial code to start with but I modified it to be more cross-platfrom compatible.
For example I replace the MS SQL database with a SQLite database
Let me guide your through the steps…
SOLUTION :
1. Check the EF framework is available :
If you see this Error:
Cannot find a manifest file.
For a list of locations searched, specify the “-d” option before the tool name.
If you intended to install a global tool, add `–global` to the command.
If you would like to create a manifest, use `dotnet new tool-manifest`, usually in the repo root directory.
Update the DotNet Manifest File.
If you are developing on Windows use this cmd :
dotnet new tool-manifest

dotnet tool install --local dotnet-ef --version 3.1.19
If you are developing in a RPI it is the same command.
To know which version you should use you can check your DotNet Core version like this :
dotnet --info
2. Start a new ASP.net App
Depending on when you want to go for an ASP MVC or Razor Pages build use this cmd.
dotnet new mvc -o C:\dotnet\ASPnetMVC
I went for the MVC version in this Example.
It will create a Template Application in your output directory like this
it will have a few less directories, but the tutorial will explain later on when to add the missing ones.
Next follow these steps in the MVC Tutorial ::
Starting with : Open Views/Shared/_Layout.cshtml and copy the code
Like this :
3. Install the Global dotnet EF Tools
Use this command for the ASP.net Core 3.1 version
dotnet tool install --global dotnet-ef --version 3.1.0
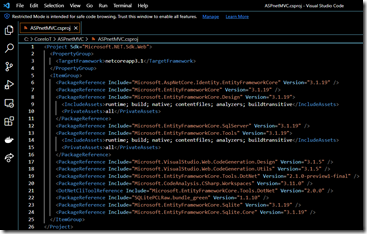
4. Add these entries in your Project File
These package versions work for 3.1.19 SDK :
<Project Sdk="Microsoft.NET.Sdk.Web">
  <PropertyGroup>
    <TargetFramework>netcoreapp3.1</TargetFramework>
  </PropertyGroup>
  <ItemGroup>
    <PackageReference Include="Microsoft.AspNetCore.Identity.EntityFrameworkCore" Version="3.1.19" />
    <PackageReference Include="Microsoft.EntityFrameworkCore" Version="3.1.19" />
    <PackageReference Include="Microsoft.EntityFrameworkCore.Design" Version="3.1.19">
      <IncludeAssets>runtime; build; native; contentfiles; analyzers; buildtransitive</IncludeAssets>
      <PrivateAssets>all</PrivateAssets>
    </PackageReference>
    <PackageReference Include="Microsoft.EntityFrameworkCore.SqlServer" Version="3.1.19" />
    <PackageReference Include="Microsoft.EntityFrameworkCore.Tools" Version="3.1.19">
      <IncludeAssets>runtime; build; native; contentfiles; analyzers; buildtransitive</IncludeAssets>
      <PrivateAssets>all</PrivateAssets>
    </PackageReference>
    <PackageReference Include="Microsoft.VisualStudio.Web.CodeGeneration.Design" Version="3.1.5" />
    <PackageReference Include="Microsoft.VisualStudio.Web.CodeGeneration.Utils" Version="3.1.5" />
    <PackageReference Include="Microsoft.EntityFrameworkCore.Tools.DotNet" Version="2.1.0-preview1-final" />
    <PackageReference Include="Microsoft.CodeAnalysis.CSharp.Workspaces" Version="3.11.0" />
    <DotNetCliToolReference Include="Microsoft.EntityFrameworkCore.Tools.DotNet" Version="2.0.0" />
    <PackageReference Include="SQLitePCLRaw.bundle_green" Version="1.1.10" />
    <PackageReference Include="Microsoft.EntityFrameworkCore.Sqlite" Version="3.1.19" />
    <PackageReference Include="Microsoft.EntityFrameworkCore.Sqlite.Core" Version="3.1.19" />
  </ItemGroup>
</Project>
Depending on which NUGET packages you had already downloaded in the past,
You will to either update to the correct version.
Download here : https://www.nuget.org/packages
Select the relevant package and make sure you download the 3.1 CORE version like this :
Scroll down ans select the 3.1.19 version
Next copy the cmd and run it :
dotnet add package Microsoft.AspNetCore.Identity.EntityFrameworkCore --version 3.1.19
Next repeat this for all the other Package references mentioned in your Project file.
5. Update your code using the Tutorial source code
Next proceed with the Tutorial at the Create the data model section :
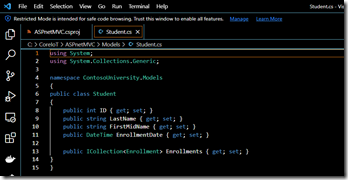
In the Models folder, create the Student class with the following code
Source code is in the Tutorial
Next proceed with Enrollment and Course
Next register the School Context
optionsBuilder.UseSqlite(@"Datasource=C:\CoreIoT\ASPnetMVC\Data\School.db");
Keep in mind that we are NOT going to use the SQL local database but SQLite
Open Startup.cs, and copy the code in there.
Keep in mind that we are NOT going to use the SQL local database but SQLite
services.AddEntityFrameworkSqlite().AddDbContext<SchoolContext>();
So I had to change the code, see indicated in the print screen
Next continue In the Data folder,
Create a new class named DbInitializer with Tutorial code
6. Creating Controller and Views
Since we do not use Visual Studio we are going to use the command line for these steps.
We are going to use the Scaffolding tool to create the VIEWS
dotnet aspnet-codegenerator razorpage -m Course -dc SchoolContext -sqlite -outDir Pages\Courses
Keep in mind the SQLite parameter ![]()
Proceed with these 2 commands for Enrollment and Student Views
dotnet aspnet-codegenerator razorpage -m Enrollment -dc SchoolContext -sqlite -outDir Pages\Enrollments

dotnet aspnet-codegenerator razorpage -m Student -dc SchoolContext -sqlite -outDir Pages\Students
Next generate the Controllers
dotnet aspnet-codegenerator controller -name StudentsController -m Student -dc SchoolContext -scripts -sqlite -outDir Controllers
You are now ready to test the ASP.net Core app
It works ![]() but looks ugly …
but looks ugly …
You need to change the Layout of each page to this
Layout = "_Layout";
7. Test your app :
dotnet run
If all is OK you can publish using the targetting runtime archtecture :
In our case we are going to use the RPI, wich is an ARM archtitecture.
dotnet publish -f netcoreapp3.1 -r linux-arm
If you want to add a Web Service API see here on how to
RESULT :
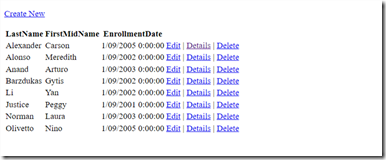
The end result is a dynamic web site linked to an SQLite database.
View the database records in a list
Add new record to the database page
View record details page
Delete a record from the database
Run it on your RPI
Once you have it published for the ARM architecture, you can copy the file over to the RPI
And run it on the Linux web server NGINX, see here how to set it up
It runs lightning fast on my RPI 3B+ with 1 Gb of memory ![]()
The ASP.net Core Web Application has a small footprint as well :
+55 Mb of memory used when started using the NGINX web server
PS :
If you are too much struggling with the source code, I can share this no problem
Just drop a message in this post
Enjoy !


Nice.
I’m making a project in windows and I want to port it to Raspberry. Is there an easiest walkthrough?
Hi Christos,
If the prerequisites are fulfillled than it is easy as can be …
PREREQUISITES :
– Make sure that the solution runs without errors on the Windows PC before compiling for RPI
STEPS :
– Open the CMD console and go to the source folder of your solution (where Program.cs is located)
– Run the command DOTNET publish -r linux-arm
see here for all the runtime options : https://docs.microsoft.com/en-us/dotnet/core/rid-catalog
– This will generated the compiled binaries for the RPI
– Next go to to subfolder inside the projects folder …\bin\Debug\netcoreapp2.0\linux-arm\publish
– Copy the bianaries to a new folder on your RPI and go that folder.
– Run the solution for example ./sqlite (if your compiled solution is called sqlite)
Enjoy !